
12 Mar User customization in Dynamics 365 Business Central
Microsoft Dynamics 365 Business Central, formerly known as Dynamics NAV, is a n ERP with which several people from the same company typically work . It is for this reason that, over the years, one of its most valued characteristics was the customization capacity it offers. Personalization, not only at the level of functionality but also in the way of working.
As different departments will be in contact with the tool, each one may want to modify the way they interact with the program, and there are even companies that leave this choice at the user level.
The good news is that Dynamics 365 Business Central reaches this level of detail and in this article we will review some of the options offered by user-level customization.
NOTE: In the 2019 wave 2 release Microsoft introduced several new features in terms of customization . If you want to review how to use bookmarks, menu customization, job profile creation, Role Center customization and column width modulation, you can read this article.
Personalization of pages and actions in Dynamics 365 Business Central
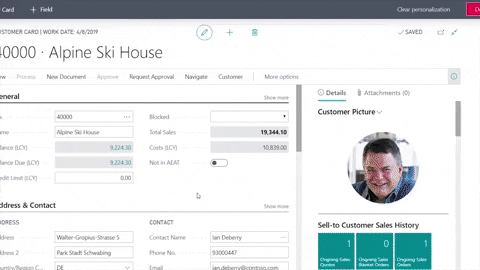
The functionality of ‘Personalization’ is what will allow us to customize any type of page in Business Central. We can enter customization mode through the configuration menu:

We will know that we are in edit mode since we are shown the following bar:

If in this bar you see a lock icon or a prohibition sign it means that you cannot customize the page since it is locked for personalization.
If you show Customization Lock or Personalization blocked on the banner, you cannot customize the page. For more details, see Why the page is locked for personalization . The reasons for the block may be different.
On the one hand, if the icon you see is the padlock, is that you last customized the page in an earlier version of the product. If you run the unlock option, you have to keep in mind that the current personalization of the page will be deleted to return to the original version and, therefore, you will have to start the zero customization.
If on the contrary you observe the icon of the prohibition sign, it means that you cannot customize the page due to limitations of your profile or work role. In this case, you should contact your environment administrator for more help.
That said, what page customization options exist?
- Move a field : Simply select the field you want to move and drag it to the new position you want. If you display a prohibition icon next to a field it means that it cannot be moved.
- Hide a field : Through the arrow that appears just to that field, you must select the hide option.

- Show fields: If you want to show a field that you hidden or that by default is not shown, you must search for it through the option ‘More’ > ‘+ Field’ of the personalization bar, select the part of the page for which you want to see the available fields and then drag it to the place wanted.
- Organize the default visualizations: In sections of the tabs with different fields it is usual that by default not all of them are displayed, but to access the complete list you must click on ‘Show more’. To decide which fields we want to see by default and which in the additional drop-down we can mark the fields as ‘Show when you contract’ or ‘Show in Show more’.

- Customize the quick entry: When you are filling in the information on a tab quickly you use the tab to jump to the fields marked ‘Quick entry’. To decide which fields you want to be part of this group you can manage it using the option ‘Exclude from fast entry’.
- Immobilization in rows and columns: When the information is shown in tables, we can decide which columns and rows to freeze to work more comfortably using the option ‘Set panel immobilization’.

Business Central enables the customization of actions , both in the menus and in the Role Center. Action is considered, for example, the ‘Register’ or ‘Launch’ buttons and their options; as well as the actions that appear after the | in the horizontal menu.
In actions, it is not always possible to edit, delete or reorder actions with what our best advice is to explore through the red arrows what actions you can perform and which you cannot.
You usually have three types of modifications available: delete, hide and show.
Clear customizations in Dynamics 365 Business Central
At any given time you may wish to delete some or all of the customizations that you have carried out on a specific page. When you click on the ‘Clear personalization’ option, the following options will appear:

When you are personalizing your pages and actions you must take into account the following considerations: The system administrator has the possibility to customize the colors shown in the work area stacks that change depending on the data values. The color indicators are the small color bars that are displayed under the batteries . They serve as visual indicators that in just a glance transmit us where we have to focus our attention (usually to the batteries marked in red, which would leave our desired values). For example, we could define to show us the indicator of the ‘Purchase invoices in progress’ stack in green (favorable indicator) if the number of purchase invoices in progress is less than 20 and that it appears in red, if it is higher to this figure. This configuration must be done from the ‘Stack configuration’ page which you can access from the application’s search engine. In this table the administrator can configure the indicators both at the company level and at the individual user level, if it could be of our interest. On the other hand, there is also the option for each user to mark their own paths, if you give them permission to do so. You may also like:
Additional information
Customizing color indicators on batteries in Dynamics 365 Business Central

