27 Aug Notes, notifications, comments and user tasks in Dynamics NAV
This same functionality was already available in previous versions using the comments button. This functionality is still available in current versions. The difference is that in older versions, comments were displayed through a pencil icon with lines (or just a pencil if there were no comments). In the new versions this icon has disappeared and this information is available in the Browse tab. Since it is not in the information box like the notes, searching for comments is less agile.
As a second benefit of using notes, we can highlight that they enable you to generate notifications, whether that is for yourself or for other Navision users. So that a note generates a notification, you need to select the field “notify” in the note and assign it to the user it is intended for. The user in question will receive the notification in the “My notifications” section of their work area. When you select the note, it will take you to the window where the note was generated from, for a better tracking of information.
Below we show you some examples of how to generate notes, comments, notifications and user tasks.
Create NOTES in Dynamics NAV
To include a note on a customer card, you can do it from the NOTES button, or by directly clicking on the link “Click here to create a new note” from the NOTES information box. In this case we will only introduce the text of the NOTE and save it without notifying any user.

Once the note is saved, the user and the date the note was generated will appear in the information box of the customer window and, if you select and open it, you will be able to see the text of the note.
But as we mentioned earlier, if you now create an order for this same customer, you won’t see any note specified.
Create NOTES with NOTIFICATIONS in Dynamics NAV
You can create a new note and, in this case, we are going to make it send a notification to a user.
This notification, as well as remaining saved on the order, will be seen by the user you have sent the notification to on their start panel in the My notifications section.
Selecting the note with the right button of the mouse, you can open the note and also open the page from where it was generated in the application and see the note directly on the page.
Now you can create a new note in which the user confirms they have contacted the customer and they have the file number and, therefore, the order can be invoiced. select the notification checkbox so that the user will receive it in My notifications and you will see the notes linked to the order on the registered invoice.
Create COMMENTS in Dynamics NAV
If, instead of using notes, you use comments, these will not be shown in an information box on the right hand side of the page where we included the comment, it will open a new window for you to enter the desired comments. You don’t have the option to send a notification either. As with notes, these comments don’t link to the customer documents.
Create USER TASKS in Dynamics NAV
Now we will experiment with the user tasks incorporated in Dynamics NAV 2018. These tasks can be created for yourself or be assigned to other users. When assigning a task to a user, it will show in their Role Centre.

When the “User Tasks” tile is selected, it opens a page where tasks can be created, select the ‘New’ button on the options ribbon to create a new task. As you can see in the image below, enter a Subject, the Task description, the Due date, the Start date and the Priority. The task can only be assigned to one user and there is an option to enter a link to the page or report to which the task refers.
You can also make a task recurrent by clicking on the option ‘Recurring frequency’ on the options ribbon.
Enter the ‘Recurring start date’, a formula for the frequency of the occurrence and the number of times the task should be repeated, and click on ‘Accept’. In this example, the task will be carried out monthly throughout the financial year, starting on 30/03/2018.
After selecting ‘Accept’, this task will be displayed on the “Pending user tasks’ page, in Due Date order. The expired tasks will be displayed with a due date in red.
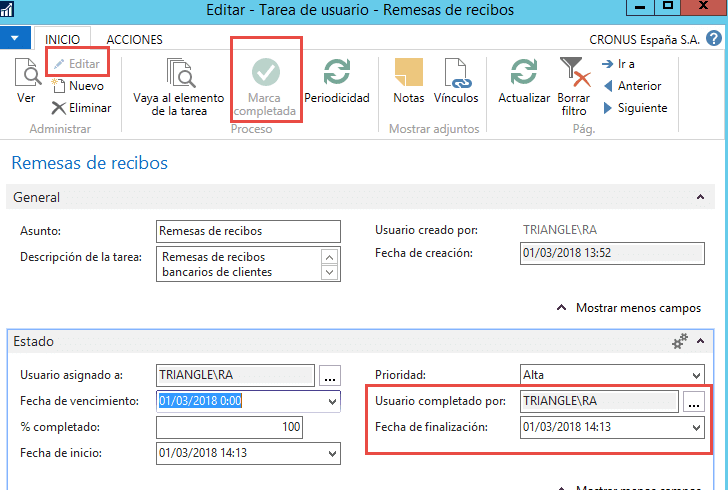
If you select ‘Go to task item’ form the options ribbon, it will take you to the page of linked tasks or to the report specified in the task. If you select the ‘Edit’ button from the options ribbon, you can change the task, change the user the task is assigned to, the % completed, the priority or the due date. You can mark the task as complete by selecting ‘Mark complete’ on the ribbon, either from the user Task or the list of pending tasks. By selecting this option, the User completed by and Completion date fields will be filled automatically.
If you select the new tile “My user tasks” and then click on “Pending user tasks”, then “Remove filter”, you can see all of the tasks, whether they are complete or not.
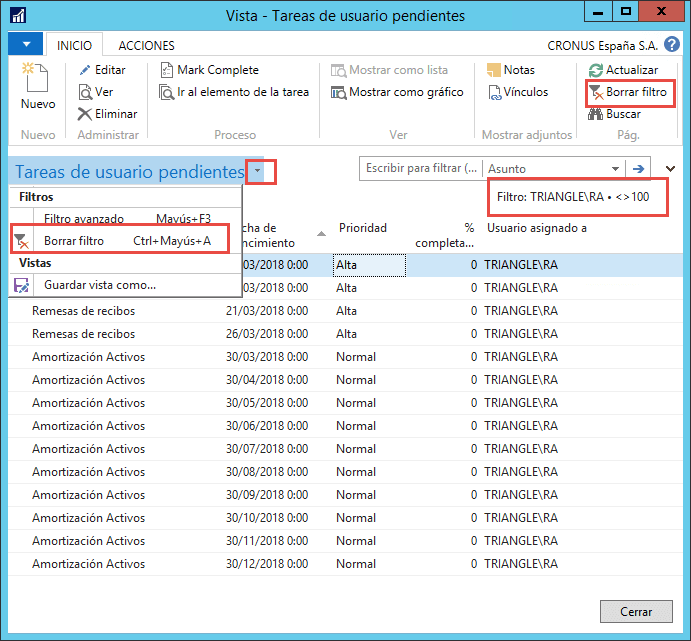
You can see previously completed tasks marked by” % completed” and you can also see the tasks assigned to other users.
