
04 Oct Business Central integration with Outlook
In this article we will show an example of Business Central integration with email, in this case Outlook.
Contact management
The example is that we are a person who manages sales and works all day from email, through integration, you do not have to be entering and leaving the ERP to configure the offers, orders, or other values.

First of all, we see that we have an email, which asks us for a budget for 4 bicycles, from the same email we can deploy the Business Central add-in, and it will indicate in this case that the email received does not belong to a customer and not registered as a contact.

We could add it directly from the email, selecting the company to which it belongs or creating a new company.
Sales Management in Outlook with Business Central
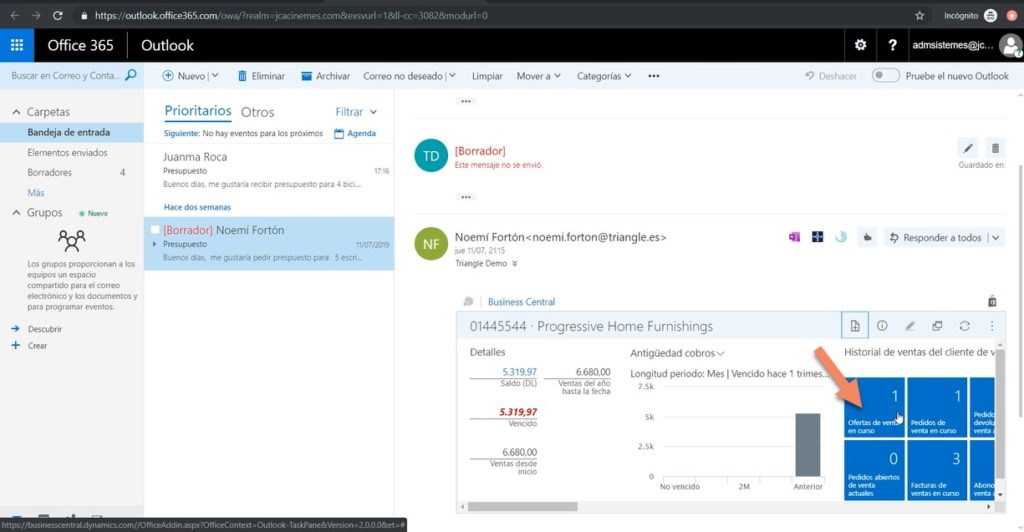
In this case our contact belongs to a customer. When we deploy the Business Central add-in, we see that it tells us that the email received is a contact from the “Progressive Home Furnishings” company, and shows us all the relevant information of this client in our add-in.

We are in the browser version and see the visualization of data in this way. If we were using the desktop version of Outlook, we will see that the distribution of space is slightly different and we will have a greater predominance of the add-in.

Important that all the data we see, both balances and orders in progress is navigable information, so that the person you are managing can click and will be able to navigate to all numbers, documents, etc.

To check if any information fits before making this offer. We will proceed to make the offer directly from -> more -> sales offer – we see that the product incorporates artificial intelligence from Cortana Intelligence and is suggesting the products, both products and quantities, that are taking them from email.

In this case, it tells us that we have 5 matching swivel chairs, if we solve the Outlook add-in, it will suggest what it is, what this customer usually buys, if we do not want to add it, we can remove this selection and in The next step, add the appropriate chair.

We take it for granted and we have our sales offer here, exactly the same as we would see in Business Central in the version from the ERP. Also, we can add the different shipping address, discounts or make the checks we create relevant. Then, we email the offer to our client.

In this step we have to make sure that we have the pop-ups allowed, so that the window that will contain our email can be opened.
We are being shown the email, which is answering the client with the PDF of the attached offer.

What we see in the text is the message we have predefined for that client that we want to be sent. In this case, as the client file we have predefined the English language, so the offer appears in English, we send it and suppose the client answers us by saying, “ok” that seems good.
We go to the sales offers in progress, which will appear in the new email, we select the sale offer we are working on. And from here we can directly convert it into an order or an invoice.

For this example we will generate the invoice and when we want to generate it, we see that it creates a sales invoice with a new numbering. We have to register it before leaving or we could do it later.

By registering the invoice you are creating the lines and other records that are derived from the creation of that invoice. As we can see, the invoice has passed to the historical one with a new numbering and we can consult it in the stacks of the historical invoices.

This is an example of the ability we have to work directly from Outlook without the need for the central ERP Business. Of course everything we are registering or all the documents we are creating directly from Outlook are being saved automatically and immediately in our ERP.
So we do not have to continually check that the information is being saved, but we simply work from email and at another time we can make the steps that we create convenient from our ERP.